I am back to share another sample we created for our Star Adventure pattern release. Before we get to it, check out the other two blogposts we have written so far!
When I was designing Star Adventure, I knew I could choose two different ways to make the points of a Sawtooth Star: Half Square Triangles (HST) or Flying Geese. I love flying geese, I have multiple patterns that use them. But, flying geese can be slightly more complicated to make and because I wanted this pattern to be beginner friendly, I decided not to use them. Also, I believe HST are a tad more versatile than a flying geese unit. I not only wanted a beginner friendly pattern, I wanted one that can show the versatility of the sawtooth star and the HST fit the bill the best.
For this sample, we chose to use the Adventurous Assembly path in the Medium Throw size which finishes at 55" x 69". We are using (20) FQs total with (10) FQs in yellows and golds for the star cuts and (10) FQs in blush and peaches for the background cuts. Because we are using FQs for the background cuts, we are also able to cut additional strips from those FQs to make scrappy sashing. The scrappy sashing option is only available when using FQs in this pattern.
In Adventurous Assembly, you also have the power to decide how you want your stars to be sewn together. You can choose from three different Star Styles: Solid Stars, Mixed Up Stars and Scrappy Stars. For this sample, we decided to do Scrappy Stars. But, I am going to show you all three mock up ideas so you can see the difference.
First up is Solid Stars. The things that remain the same in each mock up is size, material cuts and using scrappy sashing.
Second is Mixed Up Stars. This one shows how the star itself has a different center from the star points.
And the third one shows the Scrappy Star, where you pick your center square and then add (8) finished HSTs to the pile and then (4) different background squares. This provides the most scrappy looking star.
How amazing is that? Three distinctly different quilts all using the same material cuts. I love how much you get to "play" with this pattern. Let's look at the fabric!
I choose some some repeating prints, ginghams and a couple solids. I wanted this to feel like a happy picnic quilt. And you can see how I choose a distinct color family for the stars and then for the backgrounds. This way it helps define the blocks a little better, especially when sewing very scrappy.
When sewing the Scrappy Star style, it's best to make all of your HSTs first. You don't work block by block in this style because you will build your blocks after all of your pieces are "ready" to be sewn together.
This style makes batch sewing your HSTs a breeze. You can do all of them at once or you can work in smaller batches and do maybe like 5 sets at time. This helps with the amount of trimming you have to do in one session.
Once all of the HSTs are sewn, pressed and trimmed, I do recommend stacking them back up in their matching piles. This helps when building each block pile, you see how much is left of each HST combination.
Now it is time to build our actual block piles. This is where you are finally creating the very scrappy feel block by block.
Once we organized all of our blocks, it was time to sew. This part went so much faster since all of the HSTs were trimmed and ready. We were flying through sewing the actual blocks together!
When I was putting the blocks onto our design wall, the two things I looked at for placement were making sure the center squares in each block weren't right next to each other and I tried to make sure the corners of each block weren't the same fabric next to each other.
Once I finalized block placement, I went ahead and added the scrappy sashing strips between the blocks and sewed the rows together.
Once all the rows are sewn, it was time to sew the rest of our sashing pieces together into one massive strip. From there, I would attach it to each row and clip the excess for the next row.
I am really pleased with how this top turned out. The movement is really fun and I love the pops of gingham and small floral prints. It is really a happy quilt.
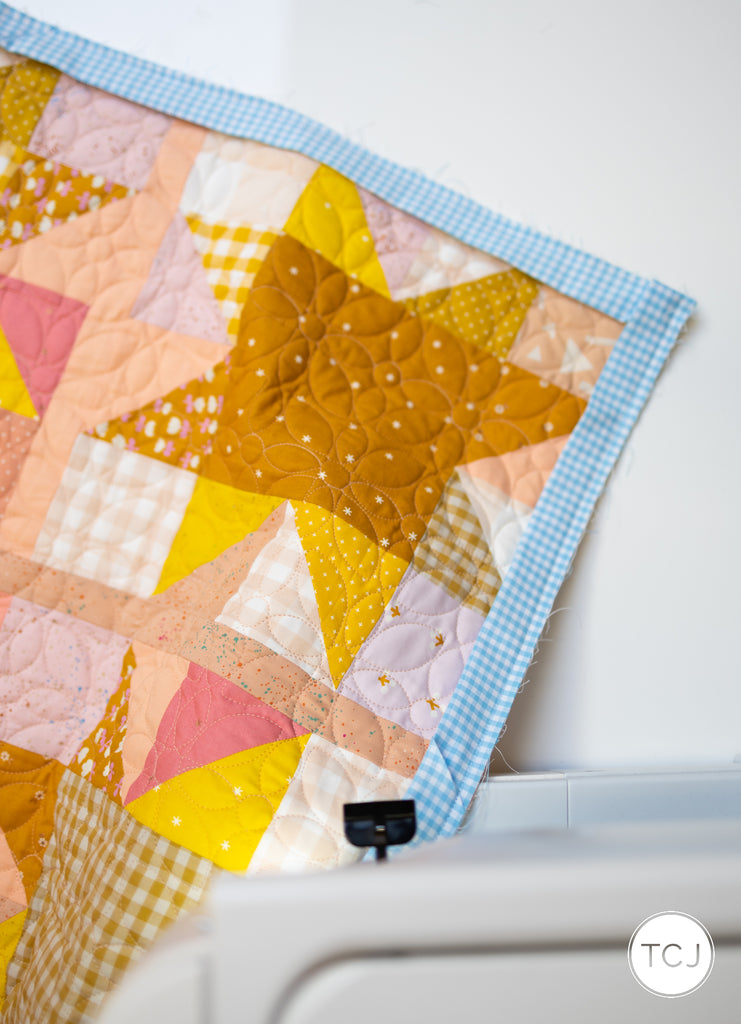
This was our last quilt top to be finished. We hustled hard to get it done and off to Emily of So Sunny Quilts. The morning I dropped it off, I saw on Instagram a new pantograph from Sew Shabby Quilting. It is called Beaded Petals and is this beautiful tile looking design. Emily was able to offset the tiles row by row so they are more interlocked than stacked. And we did peach thread. SO good!
We bound the quilt in Carolina Gingham in Pond at 1/8" and backed it in Kona Putty. I love the softness of the back and I love the blue gingham. I picked the blue as it reminds me of the sky behind a sunflower on a beautiful bright day.
We currently have kits available for this quilt - Star Adventure Sunflower. It includes the (20) FQs used to make the quilt top.
Scrappy quilts are such a joy to look at because each block looks different. I love seeing the color play and interaction between different fabrics.
This quilt is such a pop of sunshine! We snapped a few photos of me with it. And typically my friend Amy takes all of our finished product photos but it didn't work out this release. So, Luke and I snapped all the shots and tried to recreate some of the same photos Amy would take. She use to always tell me spin around and flip my hair. Well, I am not sure it looks as good as when she takes them. ha!
I love a good twirl though, especially in a dress. It immediately brings me back to being 4 and twirling everywhere.


 I choose some some repeating prints, ginghams and a couple solids. I wanted this to feel like a happy picnic quilt. And you can see how I choose a distinct color family for the stars and then for the backgrounds. This way it helps define the blocks a little better, especially when sewing very scrappy.


 We bound the quilt in Carolina Gingham in Pond at 1/8" and backed it in Kona Putty. I love the softness of the back and I love the blue gingham. I picked the blue as it reminds me of the sky behind a sunflower on a beautiful bright day.


 We currently have kits available for this quilt - Star Adventure Sunflower. It includes the (20) FQs used to make the quilt top.


